
This page is still under works. The following locations have no or incomplete...
Maps: Floating Empire (Main)
Treasure Chest Details: Selphia Plain - West / Autumn Road, Leon Karnak, Maya Road, Idra Cave, Sechs Territory, Floating Empire, Rune Prana (1-6)
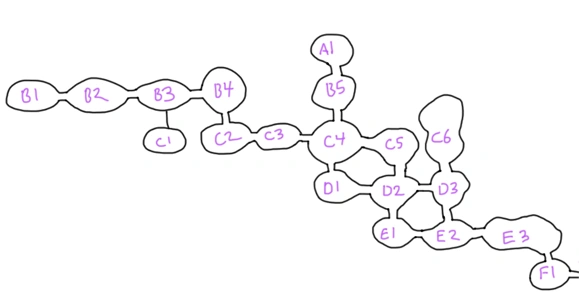
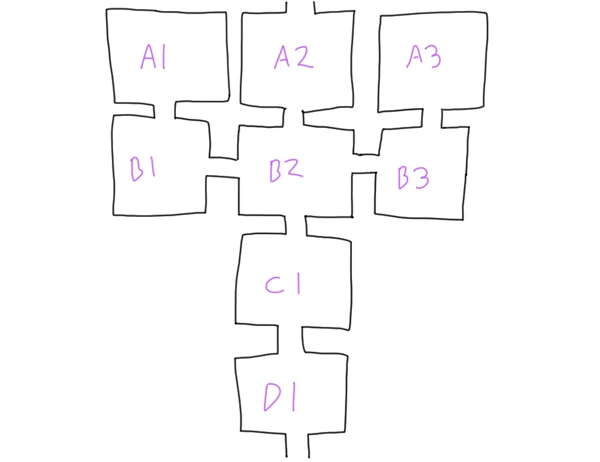
Selphia Plains
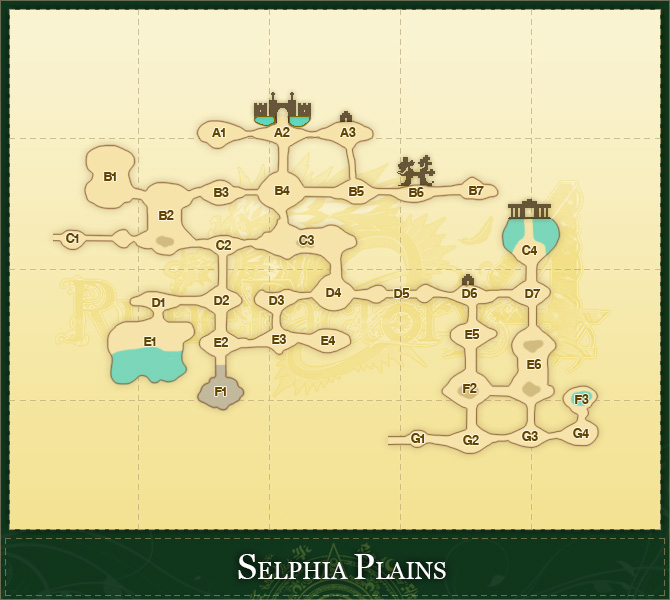
| Area | Monsters | Items | Chests | Notes |
|---|---|---|---|---|
| A1 | Wooly |
Medicinal Herb, Antidote Grass |
- | |
| A2 | - | - | - | Go north to enter Selphia. |
| A3 | - | - | - | The clothes merchant will set up shop here. |
| B1 | - |
Medicinal Herb, Amethyst Ore, Iron Ore |
X4 Turnip Seeds, X 4 Toyherb Seeds | Summer Field (2x2 area). |
| B2 |
Ant, Beetle, Pomme-Pomme |
Purple Grass, Amethyst Ore |
Power Wave, X4 Toyherb Seeds | The northern and southern halves of the area are split by a stone that can only be broken once your mining is at level 30. |
| B3 | Pomme-Pomme | Bamboo Sprout | - | |
| B4 |
Wooly, Orc, Orc Archer |
Iron Ore | - | Until you have been asked to go to the Water Ruins, the remains of a tree will prevent you from going south or west in this area. |
| B5 | Wooly | Medicinal Herb, Antidote Grass | - | |
| B6 | Wooly |
Medicinal Herb Antidote Grass |
- |
-Save Point- Go north to enter the Yokmir Forest. |
| B7 | Wooly |
Medicinal Herb, Antidote Grass, Green Grass |
- | The Buried Cave (relevant in some random events) is in this area. |
| C1 | - | X2 Boxes | Reaper Slash (skill) | Go west to Selphia Plain - West and Autumn Road. (The bridge in this area will not be built until you have been asked to go to the Obsidian Mansion.) |
| C2 |
Cluckadoodle, Pomme-Pomme |
Antidote Grass | - | |
| C3 |
Wooly, Cluckadoodle, Pomme-Pomme |
|
- | |
| C4 | - | - | - |
-Save Point- Go north to enter the Water Ruins. |
| D1 | Pomme-Pomme | Mushroom | X3 Antidote Grass | |
| D2 | Big Muck | Mushroom | - | |
| D3 | - | Mushroom | - | |
| D4 | Big Muck | Mushroom | - | |
| D5 | - | - | - | |
| D6 | - | - | - | The fortune teller living in this area will rate your compatability with mariage candiates who you bring along. |
| D7 | Chipsqueek | Medicinal Herb, Antidote Grass, Green Grass | - | |
| E1 | - | Mushroom | - | Fishing Spot: Keeno Lake (summer fishing area) |
| E2 | Big Muck, Ant | Mushroom | - | |
| E3 | Big Muck, Pomme-Pomme | Mushroom | - | |
| E4 | Death Fungus | - | - | Five days of the week, this area will be empty with a large mushroom in the center. On Fridays the mushroom will be gone, and a Death Fungus can be fought in this area. |
| E5 | - | - | Spear, Iron Shield, X3 Iron, X1 Bronze, X4 Recovery Potions | |
| E6 | Beetle, Chipsqueek, Pomme-Pomme | 800G | ||
| F1 | - | - | - |
-Save Point- Go downstairs to enter the Cluck-Cluck Nest. |
| F2 | Beetle, Pomme-Pomme | - | - | |
| F3 | - | - | - |
Fishing Spot: Summer Spring If you throw something (anything) into the pond, a Red will give you a Summer Headdress |
| G1 | - | - | - | Go west to enter Sercerezo Hill. (This bridge can't be used until Doug tells you about it after Leon has been rescued.) |
| G2 | - | - | - | |
| G3 | Chipsqueek | - | Upper Cut | A row of trees divides this area. If you enter from the west side, you will not be able to access the north or east paths. |
| G4 | Buffamoo, Wooly | - | - | Only one on the map |
Yokmir Forest

| Area | Monsters | Items | Chests | Notes |
|---|---|---|---|---|
| 1 | Orc | - | Small Shield |
-Save Point- Go south to enter Selphia Plains. |
| 2 | Orc, Orc Archer | Iron Ore, X2 Boxes | X3 Recovery Poitions | After chasing a Chipsqueek that stole Venti's Charm, you can jump off the cliff here to access Yokmir Cave Floor 1 A. |
| 3 | Orc, Orc Archer | Blue Grass, Green Grass | - | Fishing Spot: Yorkmir Forest (waterfall). |
| 4 | Ant | Blue Grass, Green Grass, X1 Box | - | |
| 5 | Ant | X2 Boxes | Leather Boots | Fishing Spot: Yorkmir Forest (lily pad area). |
| 6 | Ant | Blue Grass, Green Grass | X4 Turnip Seeds | |
| 7 | Beetle | Iron Ore, Amethyst Ore | - |
-Save Point- Once you go through Yokmir Cave a path will open in the west side of this room letting you enter the end of the cave. |
| 8 | Ambrosia, Dead Tree | - | - | After the Dead Tree appears, it will be random each day which boss monster can first be seen in this area. After defeating whichever was in the area first, you can leave and come back to fight the other. |
Cluck-Cluck Nest
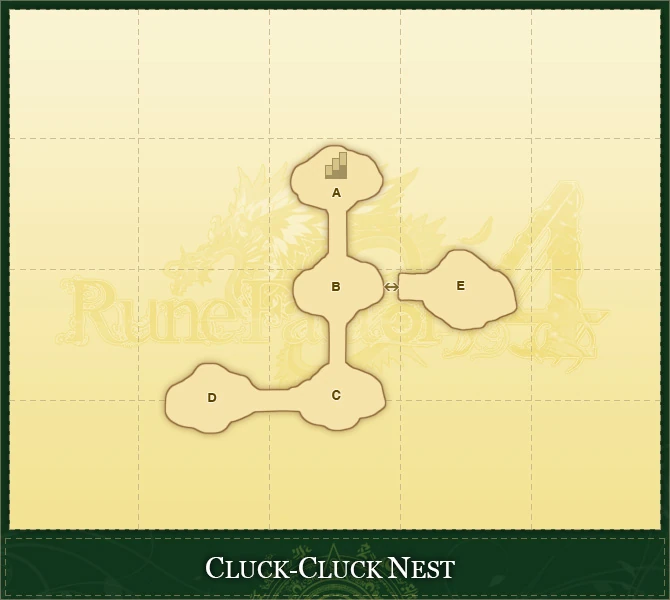
| Area | Monsters | Items | Chests | Notes |
|---|---|---|---|---|
| A | - | - | - | Stairs here lead up to the Selphia Plains. |
| B | Mamadoodle | Withered Grass, Fodder | - | 1x Mamadoodle |
| C | Mamadoodle | Withered Grass, Fodder | - | 2x Mamadoodle |
| D | Mamadoodle | Withered Grass, Fodder | - | 4x Mamadoodle |
| E | Cluckadoodle | Withered Grass, Fodder | - | 5x Cluckadoodle |
Water Ruins
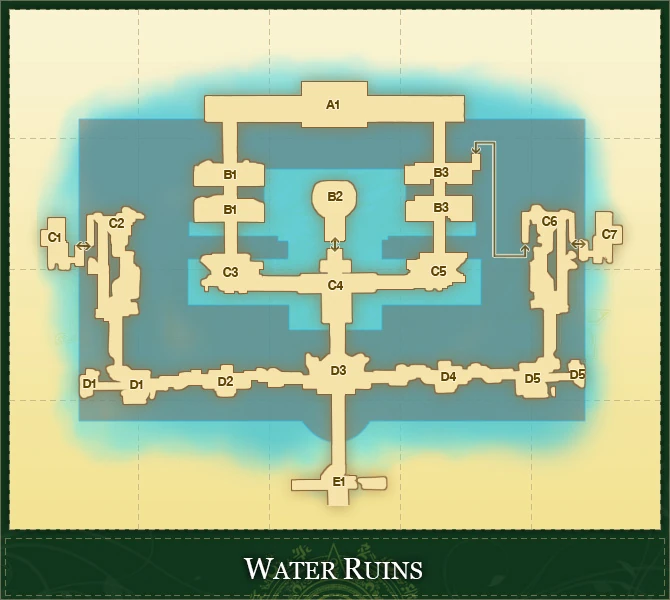
| Area | Monsters | Items | Chests | Notes |
|---|---|---|---|---|
| A1 | Weagle | - | Battle Axe, Roundoff, Paragone |
-Save Point- When you open the chest in this room, four Minotaur will appear to fight you. |
| B1 | Sky Fish, Weagle | - | - | |
| B2 | Thunderbolt | - | - | |
| B3 | Sky Fish, Tortoise | - | - | |
| C1 | Chimera | - | Water Laser |
The Chimera will not apear until you have been tasked with gathering Rune Spheres. Until that point, you will be able to see a Rune Sphere in this room. Fishing area |
| C2 | Goblin Archer, Tortoise | Iron Ore, Rune Crystal | Bronze, Aquamarine | -Save Point- |
| C3 | Tortoise, Weagle | Aquamarine Ore, Rune Crystal | - | |
| C4 | Goblin, Goblin Archer, Sky Fish, Tortoise, Weagle | X2 Boxes | X4 Recovery Potions |
-Save Point- The center of this room is not present initially. You will need go through the side entrances to hit switches on the left and right sides of the room to make the platform that lets you pass through the room appear. |
| C5 | Sky Fish, Tortoise | X2 Boxes | - | |
| C6 | Sky Fish, Tortoise | X1 Box | - | Red Lever in this room. |
| C7 | Sky Fish, Tortoise | X3 Boxes | Rod | Fishing area. |
| D1 | Goblin, Goblin Archer | Aquamarine Ore, X1 Box | - | |
| D2 | Goblin, Goblin Archer | Aquamarine Ore | - | |
| D3 | Goblin, Goblin Archer | X2 Boxes | - | |
| D4 | Goblin, Goblin Archer | - | - | |
| D5 | Goblin, Goblin Archer | X2 Boxes | Blue Ribbon | |
| E1 | Goblin | X1 Box | - | Go south to enter Selphia Plain. |
Yokmir Cave
Floor 1
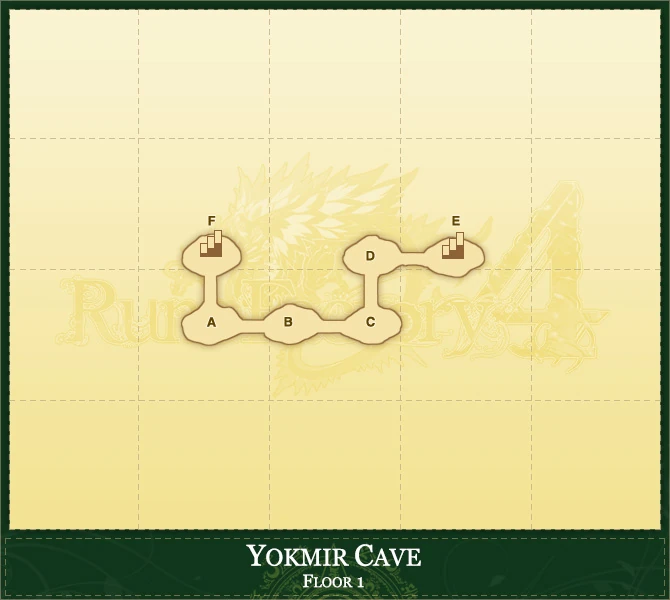
| Area | Monsters | Items | Chests | Notes |
|---|---|---|---|---|
| A | - | Emerald Ore, Rune Crystal | X2 Recovery Potion, Rice Porrige, 3630G | -Save Point- North Room blocked until Yellow Switch is turned on. |
| B | Orc Hunter 1x, High Orc 1x | - | - | - |
| C | Field Gate, Orc Hunter | - | - | - |
| D | Field Gate, Orc Hunter | - | - | - |
| E | - | Indigo Grass, Green Grass | - | Stairs go to Floor 2 A2 |
| F | - | Indigo Grass, Purple Grass | X2 Antidote Potion, X2 Paragone | Yellow Switch |
Floor 2
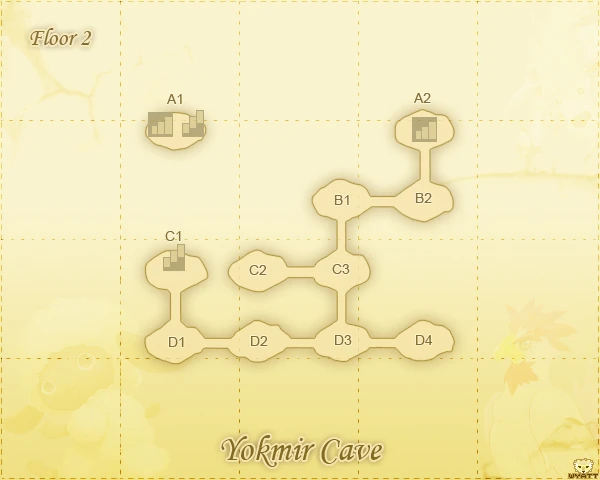
| Area | Monsters | Items | Chests | Notes |
|---|---|---|---|---|
| A1 | - | - | Onigiri, Salmon Onigiri | Stairs down goes to Floor 1 F, Stairs up goes to Floor 3 C1 |
| A2 | - | Silver Ore, Rune Crystal | - |
-Save Point- Stairs go down to Floor 1 E |
| B1 | Field Gate, Killer Ant | X2 Boxes | - | - |
| B2 | Killer Ant | Emerald Ore | ||
| C1 | - | - | - | - |
| C2 | Field Gate, Ant, Hornet | - | Para-Gone, Recovery Potion, Cotton Cloth | - |
| C3 | Hornet | - | - | - |
| D1 | Field Gate, Killer Ant, High Orc, Hornet | - | - | - |
| D2 | Killer Ant, Hornet | - | - | - |
| D3 | Field Gate, Hornet | - | - | There's an Orange Tree you can pick Oranges from. |
| D4 | Field Gate, Orc Hunter, Killer Ant, Ant | - | Sonic Wind | - |
Floor 3
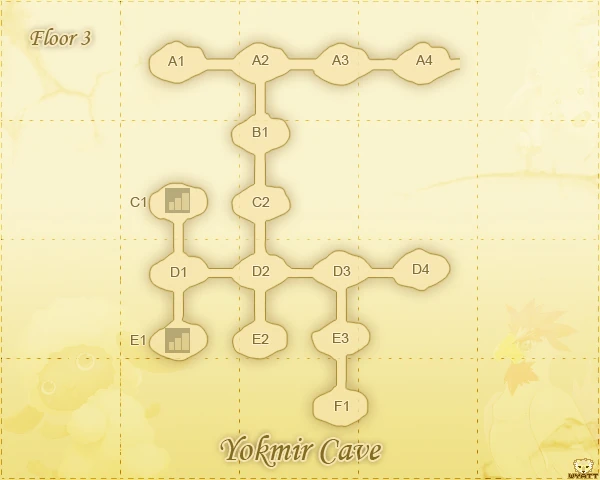
| Area | Monsters | Items | Chests | Notes |
|---|---|---|---|---|
| A1 | Field Gate, Orc Hunter, High Orc, Silver Wolf | - | Dash Slash | |
| A2 | Leaf Ball, Silver Wolf | Bonze Ore | - | |
| A3 | Killer Ant, High Orc, Silver Wolf | X1 Box | - | |
| A4 | Field Gate, High Orc, Killer Ant | Iron Ore, Bronze Ore, Amethyst, Emerald Ore | - | Goes to Yokmir Forest 7 |
| B1 | Silver Wolf, Wolf Rider | - | X4 Yam Seeds | - |
| C1 | - | X2 Boxes | - | Stairs down goes to Floor 2 A1 |
| C2 | Leaf Ball, High Orc | - | - | - |
| D1 | Field Gate, Leaf Ball | Amethyst Ore | - | Right Room blocked until yellow switched hit |
| D2 | Leaf Ball, Hornet, Orc Hunter | Rune Crystal | - | - |
| D3 | Field Gate, Silver Wolf | Aquamarine Ore | - | - |
| D4 | Leaf Ball, Silver Wolf | - | X3 Bronze, X1 Silver | - |
| E1 | - | - | - | Stairs down goes to Floor 2 C1 |
| E2 | Leaf Ball, Orc Hunter | - | Staff, Bronze Bracelet | Have a villager in your party and talk to the rock to access Purple Switch |
| E3 | Field Gate, Killer Ant, Silver Wolf | - | - | - |
| F1 | High Orc, Orc Hunter, Silver Wolf | - | - | Red Switch |
Selphia Plain - West / Autumn Road
| Area | Monsters | Items | Chests | Notes |
|---|---|---|---|---|
| A1 | - | - | - | The tree in this area contains tree seeds. |
| B1 | - | - | Go north from here to enter Leon Karnak. | |
| B2 | Ant, Beetle | - | - | |
| C1 | Duck, Fairy, Weagle | - | - | -Save Point- |
| C2 | Duck, Weagle | - | - | |
| C3 | Ant, Duck | Shade Ore | - | The bottom half of this area will darken, indicating that Shade Stones can be mined here. |
| C4 | Duck, Pomme Pomme | - | - | |
| C5 | - | - | Black Ribbon |
-Save Point- The chest is hidden behind the fence on the right side. Go north from here to enter the Obsidian Mansion. |
| C6 | Duck | Bronze Ore | - | |
| C7 | Duck | - | - | Go east from here to Selphia Plains. |
| D1 | - | - | Gust (skill) | Run around the two rocks in an infinity pattern to make the chest appear. |
| D2 | Fairy | - | - | |
| E1 | - | - | X4 Leek Seeds | Winter Field (4x3 area) |
| E2 | - | - | - | Go down the pit to enter the Revival Cave. |
| E3 | Flower Lily, Mino, Palm Cat, Red | - | - | |
| E4 | - | - | - |
Fishing Spot: Autumn Spring If you throw a jewel into the pond, a Green will give you an Autumn Headdress. |
| E5 | Palm Cat | X2 Boxes | - |
-Save Point- Go north from here to enter the Delirium Lava Ruins. |
| E6 | - | - | - | -Save Point- |
| E7 | - | - | X3 Healing Potions, 5200G | |
| E8 | - | X3 Boxes | - | This bridge will not be accessible until you need to investigate the Delirium Lava Ruins. |
|
E9 |
Chipsqueek, Fairy, Pomme Pomme | - | - | |
| F0 | - | - |
Intelligencer Recipe: Glitter Sashimi Joy Waterpot Golden Turnip Staff |
Silver Lake is accesible only with Water Shoes. You'll see a path that leads into the water in F1 that will lead you east into a water area with four chests. |
| F1 | Emperor Penguin, Snowy | - | ||
| F2 | - | - | - |
Fishing Spot: Winter Spring If you thow a flower into the pond, a Blue will give you a Winter Headdress. |
| F3 | Flower Lily, Mino, Palm Cat | - | - | |
| F4 | Big Muck, Trick Muck | Mushroom | - | |
| F5 | Big Muck, Flower Lily, Palm Cat, Trick Muck | Yellow Grass, Mushroom | - | |
| F6 | Palm Cat | Bronze Ore, Silver Ore | - | |
| F7 | Fairy, Furpy | Yellow Grass | Kote, X3 Silver | |
| F8 | Duck, Fairy, Sky Fish | - | Bamboo Rice, Salmon Sashimi, Vest | |
| G1 | - | - | ||
| G2 | Emperor Penguin, Snowy | - | - | |
| G3 | Snowy | - | - | |
| G4 | - | - | - | |
| G5 | King Wooly | - | - | |
| G6 | Flower Lily, Mino, Palm Cat | Rune Crystal | - | |
| G7 | - | - | - | Warp to F7 |
| G8 | - | - | Dark Ball | |
| G9 | Flower Lily, Furpy, Palm Cat | Silver Ore | - | |
| G10 | Palm Cat | - | - | |
| G11 | - | - | Screw Rock | |
| G12 | - | - | ||
| H1 | - | - | - | Fishing Spot: Silver Lake |
| H2 | - | Silver Ore | - | Fishing Spot: Autumn River |
| H3 | - | - | - | Trees will block you from going south here. Come during a typhoon or rain storm while there is thunder, and lighting will destroy a tree so that you may pass. |
| I1 | - | - | Go west from here to Maya Road. | |
| I2 | - | - | ||
| I3 | Furpy, Mino | Rune Crystal, X1 Box | 7,200G | |
| I4 | Flower Lily, Palm Cat, Trick Muck | - | 186,000G, Parallel Laser (spell) | |
| J1 | - | - | X4 Carrot Seeds | Autumn Field (2x3 area) |
|
J2 |
- | - | Chaos Shield, Ruby Ring, Naive Blade, Pancakes, Fruit Smoothie, X4 Eggplant Seeds |
Obsidian Mansion
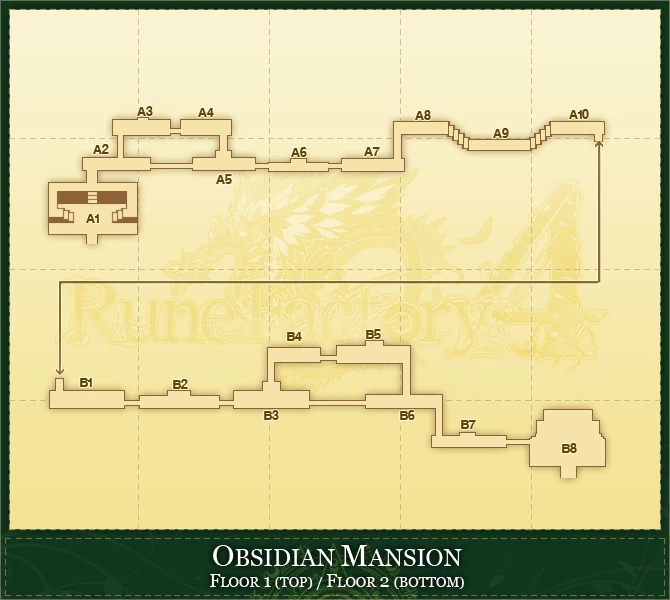
| Area | Monsters | Items | Chest | Notes |
|---|---|---|---|---|
| A1 | Ghost | - | - | When first entering this room, read the diary then check behind the painting to the right of the door to proceed. Go south to Selphia Plain - West |
| A2 | Ghost | - | - | - |
| A3 | Ghost | - | Steel Edge, 1,800G | - |
| A4 | Ghost | X3 Boxes | - | - |
| A5 | Ghost, Spider, Onion Ghost | - | - | Ghost will be in this room the first time you enter. Afterward, it will always be inhabitted by spiders. |
| A6 | Spider | - | - | - |
| A7 | Ghost, Spider | - | - | The chandelier in this room will fall as you walk under it. |
| A8 | - | X3 Boxes | - | - |
| A9 | Ghost, Shadow Panther | Black Grass | Heart Drink, X3 Recover Potion | - |
| A10 | - | - | - | - |
| B1 | Slime | - | - | - |
| B2 | Shadow Panther, Slime | - | - | - |
| B3 | - | - | 2,500G | - |
| B4 | Spirit | - | - | - |
| B5 | Shadow Panther, Spirit | - | - | Dolls will fall from the ceiling in this room to the right of the chandelier. (They do enough damage to kill anyone around the recommended level for this dungeon.) |
| B6 | Ghost, Spirit | - | Flash Strike | |
| B7 | Ghost Ray, Shadow Panther, Slime, Spirit | - | - | -Save Point- |
| B8 | Marionetta | - | Cure (Just outisde the souther exit from the room.) | The tables and chairs in this room can be picked up and thrown. After defeating Marionetta you can exit this room to the south the enter Selphia. |
Delirium Lava Ruins
Floor 1
| Area | Monsters | Items | Chests | Notes |
|---|---|---|---|---|
| A1 | Buffaloo | Silver Ore, Ruby Ore | - | Yellow Lever in this room. |
| A2 | Furpy, Palm Cat, Tricky Muck | Red Greass | - | This room will continuously deal fire damage to anyone in it. |
| A3 | Furpy, Palm Cat, Tricky Muck | - | - | |
| A4 | Furpy, Palm Cat | Red Grass | - | |
| A5 | - | - | - | Go south to enter the Autumn Road. |
| B1 | Buffaloo, Furpy | - | - | |
| B2 | Buffaloo, Palm Cat | - | X4 Healing Potions | |
| B3 | Buffaloo, Furpy, Palm Cat | - | - | |
| B4 | Goblin Pirate | - | X3 Healing Potions, Rush Punch (Skill) | Clear room for lever to show. |
| B5 | Furpy, Goblin Pirate | - | - | This room will continuously deal fire damage to anyone in it. |
| C1 | - | - | - | Stairs here lead to the 2nd floor, J1. |
| C2 | Buffaloo, Goblin Gangster, Goblin Pirate | - | - | There is a hidden passage on the left side of the room. |
| C3 | Goblin Gangster, Goblin Pirate, Palm Cat | - | - | |
| C4 | Goblin Gangster, Goblin Pirate | X2 Boxes | - | |
| C5 | Goblin Gangster, Goblin Pirate | - | - | |
| C6 | Goblin Gangster | - | Bonus Concerto | Opening the treasure chest in this room will summon monsters |
| D1 | Goblin Gangster, Goblin Pirate | - | Trident | This room will continuously deal fire damage to anyone in it. |
Floor 2
| Area | Monsters | Items | Chests | Notes |
|---|---|---|---|---|
| A1 | Rafflesia | - | - | |
| B1 | - | Red Grass, Ruby Ore | - | -Save Point- |
| B2 | Buffaloo, Troll | - | - | This room will continuously deal fire damage to anyone in it. |
| C1 | Palm Cat, Troll | - | - | This room will continuously deal fire damage to anyone in it. |
| C2 | Flower Lion, Goblin Pirate, Ignis, Troll | - | - | |
| C3 | Flower Lion, Goblin Gangster, Tomato Ghost | - | - | |
| D1 | Buffaloo, Flower Lion, Goblin Gangster, Goblin Pirate | X4 Boxes | Cure All | |
| D2 | Goblin Gangster, Goblin Pirate, Scorpion | X2 Boxes | - | This room will continuously deal fire damage to anyone in it. |
| D3 | Troll | - | - | |
| E1 | Goblin Pirate | X1 Box | - | |
| E2 | Flower Lion, Ignis, Tomato Ghost | - | - | |
| E3 | Flower Lion, Buffaloo, Scorpion | - | - |
Red Lever in this room. This room will continuously deal fire damage to anyone in it. |
| F1 | Flower Lion, Tomato Ghost | - | Big Fire | |
| G1 | Buffaloo | Red Grass, Silver Ore, Ruby Ore | - | This room will continuously deal fire damage to anyone in it. |
| G2 | Palm Cat, Scorpion | - | Cheese Bread, X3 Recovery Potions | Green Lever in this room. |
| H1 | Ignis, Tomato Ghost | - | Light Barrier | |
| H2 | Buffaloo, Furpy, Goblin Gangster, Goblin Pirate, Scorpion | - | - | This room is horrible. Good luck backtracking through it. |
| H3 | Tomato Ghost | - | - | |
| H4 | Scorpion | - | - | There is a hidden passage on the right side of the room. |
| H5 | - | - | Silver Boots | |
| I1 | Ignis | - | X2 Silver, X2 Gold | This room will continuously deal fire damage to anyone in it. |
| I2 | Buffaloo, Ignis, Scorpion | - | - | |
| I3 | Ignis | Silver Ore, Ruby Ore | - | |
| J1 | - | X2 Boxes | - | Stairs here lead to first floor, C1. |
Leon Karnak
| Area | Monsters | Items | Chest | Notes |
|---|---|---|---|---|
| A1 | Sano and Uno | - | If you scale Leon Karnak before activating the Memories event, these bosses will refuse to fight you. | |
| A2 | - | - | ||
| A3 | Sarcophagus | - | The entryway to this room is blocked by Sano and Uno. They must be defeated whenever you wish to enter. | |
| B1 | - | - | ||
| B2 | Goblin Don, Minotaur King | Orichalcum Ore | ||
| B3 | Arch Daemon, Minotaur King | Orichalcum Ore | -Save Point- | |
| C1 | Goblin Captain, Goblin Don, Little Emperor, Malm Tiger, Minotaur King | Orichalcum Ore, X1 Box | There is a pressue switch controlling a barrier hidden under the box. Break it with magic to proceed. | |
| C2 | ||||
| D1 | Arch Daemon, Goblin Don, Little Emperor | Ellie Leaves | ||
| D2 | - | X1 Box |
Purple Lever in this room. The warp area in this room will take you to C2. You will need to backtrack to open a path straight through this room. | |
| D3 | - | Ellie Leaves, Orichlcum Ore, X1 Box | ||
| D4 | Grimoire 2 | - | ||
| E1 | Little Emperor, Malm Tiger, Nappie | Rune Crystal, X2 Boxes | -Save Point- | |
| F1 | Goblin Captain, Nappie | X3 Boxes | ||
| F2 | Little Emperor, Mineral Squeek | |||
| F3 | Malm Tiger, Mineral Squeek | |||
| F4 | Little Emperor, Malm Tiger, Nappie | X1 Box | ||
| F5 | Goblin Captain, Goblin Don | - | Red Lever in this room. | |
| F6 | Goblin Captain, Goblin Don | - | ||
| G1 | Goblin Captain, Goblin Don, Nappie | |||
| G2 | Goblin Captain, Goblin Don | Orichalcum Ore, X2 Boxes | Lamellar Vest, X3 Vital Gummies | Yellow Lever in this room. |
| G3 | Goblin Captain, Goblin Don | X2 Boxes | ||
| G4 | Chipsqueek, Furpy, Mineral Squeek | - | ||
| H1 | - | - |
-Save Point- Go south to Selphia Plain - West. The door in this room will take you to Rune Prana after you have defeated Sarcophagus for a second time. |
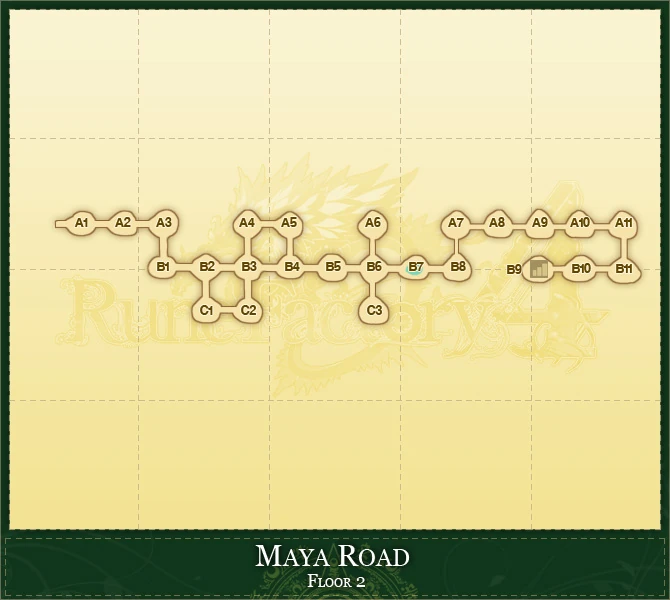
Maya Road
Floor 1
| Area | Monsters | Items | Chest | Notes |
|---|---|---|---|---|
| A1 | - | - |
-Save Point- Stairs in this area lead down to Maya Road Cave A1 | |
| A2 | - | Strong winds blow east across this area. | ||
| A3 | - | Blitz (skill) | Strong winds blow east across this area. | |
| A4 | - | Blue Grass, Indigo Grass, Purple Grass | Stairs in this area lead down to Maya Road Cave A3 | |
| A5 | - | X3 Boxes | Stairs in this area lead down to [unmapped area] | |
| A6 | Hornet Queen | - | Wind blows south-east in across this area. | |
| A7 | - | Blue Grass, Purple Grass, x2 Boxes |
Red Lever in this area. Stairs in this area lead down to [unmapped area] | |
| B1 | Hornet Queen | - | The pit in this area will drop you into [unmapped area] | |
| B2 | - | - | The pits in this area will drop you into [unmapped area] | |
| B3 | - | - | The pit in this area will drop you into [unmapped area] | |
| B4 | Hammer Troll, Hercules | - | Wind blows south across this area. | |
| B5 | Hammer Troll, Hercules | Emerald Ore | ||
| C1 | Hammer Troll | Green Grass, Blue Grass, Purple Grass | ||
| D1 | Hercules | - | ||
| D2 | - | Green Grass, Blue Grass | -Save Point- |
Floor 2
| Area | Monsters | Items | Chest | Notes |
|---|---|---|---|---|
| A1 | Fiersome | - | - | |
| A2 | - | Orange Grass | Save Point | |
| A3 | Airror, Blackbird, Hammer Troll, Heracles, Hornet Queen, Planchoa | - | ||
| A4 | Blackbird, Planchoa | |||
| A5 | Airror, Heracles, Hornet Queen | Bolders drop at random in this area. | ||
| A6 | Hammer Troll, Hornet Queen, Planchoa | - | Green Lever in this area. | |
| A7 | Blackbird | - |
Wind blows southeast across this area. Hidden pitfalls here will drop you down to Cave 2, B1. | |
| A8 | Blackbird | - |
Wind blows south across this area. Hidden pitfalls here will drop you down to Cave 2, B2. | |
| A9 | Blackbird, Hornet Queen | Red Grass, Yellow Grass | ||
| A10 | Blackbird | - |
Wind bloes south-east across this area Pit here will drop you down to Cave 2, B4. | |
| A11 | Blackbird, Hornet Queen | - | Hidden pitfalls here will drop you down to Cave 2, B5. | |
| B1 | Airror, Blackbird Hammer Troll, Hornet Queen, Planchoa | Orange Grass | ||
| B2 | Airror, Hammer Troll | - | ||
| B3 | Airror, Planchoa | - | ||
| B4 | Airror, Blackbird | - | Bolders drop at random in this area. | |
| B5 | Airror | X2 Boxes | Bolders drop at random in this area. | |
| B6 | Heracles, Hornet Queen, Planchoa | Amethyst Ore, Emerald Ore | ||
| B7 | Green | Emerald Ore | Fishing Area | |
| B8 | - | X2 Boxes | -Save Point- | |
| B9 | - | Gold Ore, Aquamarine Ore, Ruby Ore | Stairs lead down to Cave 2 B3 | |
| B10 | Blackbird, Hornet Queen | - | ||
| B11 | Blackbird | - | ||
| C1 | Blackbird, Planchoa | - | Bolders drop at random in this area. | |
| C2 | Airror | - | Bolders drop at random in this area. | |
| C3 | Blackbird, Hornet Queen, Planchoa | - | Pink Lever in this area. |
Maya Road(Cave) 1 & 2
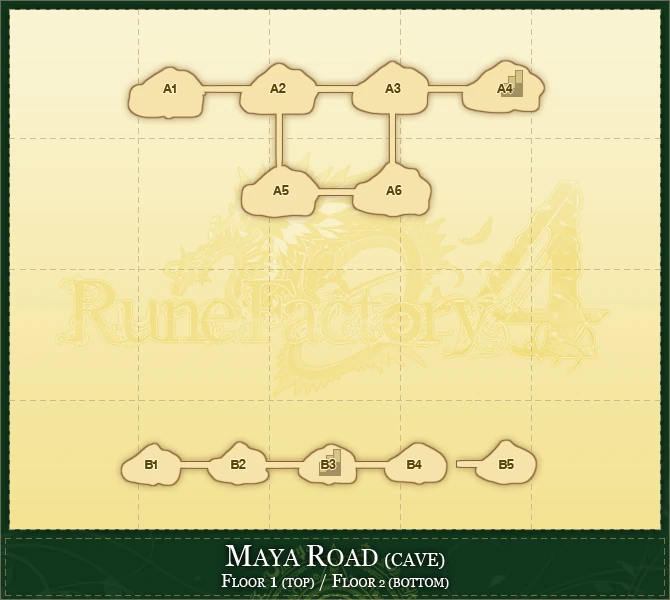
| Area | Monsters | Items | Chest | Notes |
|---|---|---|---|---|
| A1 | - | X2 Boxes | Stairs in this room lead up to Floor 1 A1 | |
| A2 | ??? | Sapphire Ore | ||
| A3 | ??? | Iron Ore, Bronze Ore, Aquamarine Ore | A crevince prevents you from going south from this room to A6. | |
| A4 | - | Black Grass, Bronze Ore | Stairs in this room lead up to Floor 1 A4 | |
| A5 | ??? | - | ||
| A6 | ??? | - | ||
| B1 | - | X2 Boxes | ||
| B2 | ??? | Gold Ore | ||
| B3 | ??? | - | Stairs in this room lead up to Floor 2 B9 | |
| B4 | ??? | Silver Ore, Gold Ore, Rune Crystal | You cannont go east from this room. The path leading to B5 is one way. | |
| B5 | - | - | Prism |
Sercerezo Hill
| Area | Monsters | Items | Chest | Notes |
|---|---|---|---|---|
| A1 | - | - | - |
Fishing Spot: Spring Spring. If you throw a giant crop into the pond, a Yellow will give you a Spring Headdress. |
| A2 | - | Orange Grass | X4 Cherry Grass Seeds, X4 Strawberry Seeds | Spring Field ( 2x4 area) |
| A3 | Shmooly | Orange Grass | - | -Save Point- |
| A4 | - | - | - | Go east to Selphia Plains. |
| B1 | - | |||
| B2 | Flower Blossom, Shmooly | - | Medipoison (Only Accessible during Friday) | The trees in this area will rearrange themselves daily, and you cannot always access all paths or always reach the chest. |
| B3 | Typhoon | - | - | The monster Typhoon will only appear during a typhoon weather pattern. |
| B4 | Flower Blossom | Orange Grass | - | |
| B5 | - | X2 Boxes | - | Fishing Spot: Sand pond. |
| C1 | Elefun, Flower Blossom, Onion Ghost, Shmooly, Yellow | Shine | ||
| C2 | - | Sapphire Ore | - |
-Save Point- The mouth of Idra Cave is in this area. |
| C3 | - | Orange Grass | - | The man who lives in this area will tell you how many chests you have opened. |
| C4 | - | - | - | After the 5th day of any season, you will not be able to go south from this area. |
| C5 | Elefun, Flower Blossom | - | - | |
| C6 | - | Crystal Seeds | Silver Staff (left side of room) | If you enter this area from the east, there is a tree which you can search to find Crystal Flower Seeds. It will drop a different color each season. |
| C7 | Flower Blossom | - | Stardust Upper (skill) | |
| D1 | - | - | - | Fishing Spot: Sercerezo Lake |
| D2 | - | X2 Boxes | X4 Recovery Potions |
-Save Point- Go down the stairs to enter the Demon's Den. |
| D3 | Flower Blossom, Onion Ghost | - | - | |
| D4 | Flower Blossom, Onion Ghost | - | - | If you clear this area of monsters, a switch will appear under the trees on the left side of the room that activates a portal, which will warp you to D5. The switch itself is not visible, but it is accessible. |
| D5 | - | - | Scale Vest, Storm (skill), Grape Liqueur, Grilled Shrimp |
Idra Cave
Ground Floor

| Area | Monsters | Items | Chests | Notes |
|---|---|---|---|---|
| A1 | - | Gold Ore, Sapphire Ore | Stairs lead down to Basement 1 B4 | |
| B1 | Necro | - | Yellow Lever in this room. | |
| B2 | Goblin Sniper, Hobgoblin, Flower Blossom | X2 Boxes | ||
| B3 | Elefun, Goblin Sniper | - | Red Lever in this room. | |
| C1 | - | Orange Grass | ||
| C2 | Goblin Sniper | X1 Box | ||
| C3 | Goblin Sniper, Hobgoblin | Rune Crystal | There is a hidden path going south from this room. | |
| D1 | Hobgoblin | Gold Ore, Sapphire Ore | Fishing Area | |
| D2 | Hobgoblin | - | ||
| D3 | - | - | Mediparalyze | |
| E1 | - | - | Exit south to go to Sercerezo Hill. |
Basement 1

| Area | Monsters | Items | Chests | Notes |
|---|---|---|---|---|
| A1 | Hobgoblin | - | 12,600G | This room will poison anyone who enters it. |
| A2 | Goblin Sniper, Hobgoblin, Minotaur | X2 Bomb Boxes | - | |
| A3 | - | - | - |
Yellow Lever in this room. Warp goes to B4 |
| A4 | - | Gold Ore, Rune Crystal | - | Stairs lead down to Basement 2 F1 |
| A5 | - | - | - |
Green Lever in this room. Warp goes to B4 |
| A6 | Little Mage, Necro | X3 Bomb Boxes | - | Fishing Area |
| A7 | Hobgoblin, Little Mage | X4 Bomb Boxes | Orange Ribbon | |
| B1 | Minotaur, Necro | - | - | Pink Lever in this room. |
| B2 | Goblin Sniper, Minotaur | X2 Boxes | - | |
| B3 | Faust, Minotaur | Orange Grass, X9 Bomb Boxes | - | |
| B4 | - | X1 Box | - |
-Save Point- Stairs lead up to Ground Floor A1 Left warp goes to C2, Right goes to C3 |
| B5 | Goblin Sniper, Little Mage, Necro | Rune Crystal | Sapphire Rod | |
| B6 | Goblin Sniper, Hobgoblin, Little Mage | - | - | |
| B7 | Goblin Sniper | - | - | Blue Lever in this room. |
| C1 | - | - | Mind Thrust (Skill) | |
| C2 | Hobgoblin, Minotaur | - | - |
Red Lever in this room. The Wooly in this room will give you items if you speak to them. There is a hidden path going west from this room. |
| C3 | Minotaur | - | - | |
| C4 | Little Mage | - | - | |
| C5 | Little Mage | Gold Ore | - | The Chipsqueek in this room will give you items if you speak to them. |
| C6 | - | - | Million Strike (skill) | Stairs in this room lead down to Basement 2 F4 |
Basement 2

| Area | Monsters | Items | Chests | Notes |
|---|---|---|---|---|
| A1 | Terraclone | - | - | |
| B1 | - | - | - | Warp goes to F5 |
| B2 | - | Rune Crystal, X4 Boxes | - | -Save Point- |
| C1 | Daemon, Gaias | - | ||
| C2 | Gaias | Sapphire Ore, Rune Crystal | - | |
| C3 | Daemon, Gaias, Little Golem, Little Mage Minotaur | - | ||
| C4 | Gaias, Necro, Little Golem | X2 Boxes, X1 Bomb Box | - | |
| C5 | Goblin Sniper, Hobgoblin, Little Golem | X2 Boxes, X4 Bomb Boxes | - | |
| D1 | - | - | Double Sonic | |
| D2 | Daemon, Minotaur | Rune Crystal | - | |
| D3 | - | - | Gold Bracelet | |
| D4 | Daemon | - | There is a one way hidden path going west from this room. | |
| D5 | Gaias | Rune Crystal | - | |
| E1 | Little Mage, Minotaur | - | - |
Red Lever in this room. There is a Green in this room that will offer to join you. |
| E2 | Goblin Archer, Hobgoblin, Minotuar, Necro | - | - | |
| E3 | Daemon | Gold Ore | - | Fishing Area |
| E4 | Little Golem | - | Earth Spike | |
| E5 | Daemon, Minotaur | - | Choco Cookie | |
| F1 | - | Rune Crystal | - | Stairs lead up to Basement 2 A4 |
| F2 | Daemon, Hobgoblin | - | X4 Mystery Potions | |
| F3 | Daemon, Little Mage | Wind Edge |
Purple Lever in this room. There is a hidden path going east from this room. | |
| F4 | Daemon | - | - | Stairs lead up to Basement 1 C6 |
| F5 | - | - | - |
Sechs Territory
Field 1
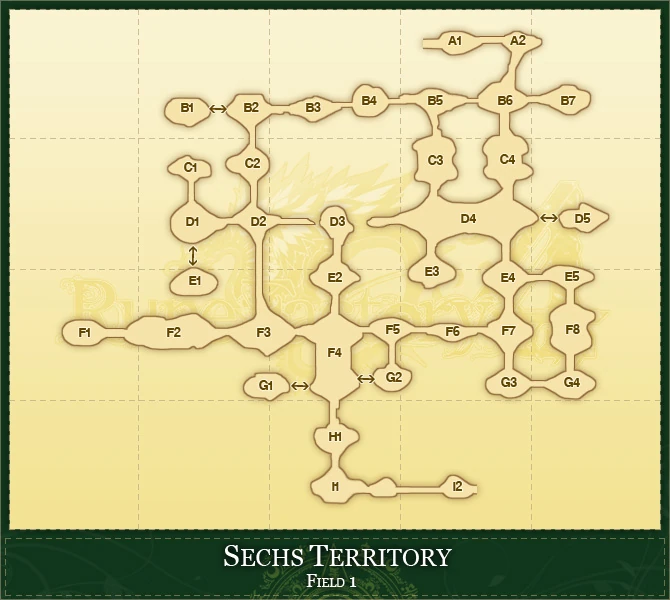
| Area | Monsters | Items | Chests | Notes |
|---|---|---|---|---|
| A1 | Sealy | Diamond Ore, Rune Crystal | Go west to enter cave C5. | |
| A2 | Orc Viking, Sealy | - | Blue Lever in this room. | |
| B1 | - | - | Miracle Axe (Recipe) | |
| B2 | Emperor Penguin | - | There is a hidden path on the left side of the area. | |
| B3 | Ogre Viking, Tundra | - | ||
| B4 | Tundra | - | The tree in this area may contain Tree Seeds. | |
| B5 | - | X1 Box | ||
| B6 | Emperor Penguin, Ogre Viking, Orc Viking, Snowy | Diamond Ore | ||
| B7 | Sealy, Tundra | - | ||
| C1 | Mammoo, Orc Viking, Tundra | - | ||
| C2 | - | - | ||
| C3 | Emperor Penguin, Ogre Viking, Orc Viking | Diamond Ore | ||
| C4 | Ogre Viking, Orc Viking | - | This room is split in half by a line of trees. You cannot pass through it. | |
| D1 | Mammoo, Ogre Viking | - | There is a hidden path at the bottom of the area. | |
| D2 | Mammoo | Diamond Ore, X2 Boxes | Go east from this area to acess the Light Blue Lever. | |
| D3 | - | - | Go north to enter cave A1 | |
| D4 | Emperor Penguin, Orc Viking | X4 Boxes |
There is a hidden path on the right side of the area. Purple Level accessed by going left from this area. | |
| D5 | - | X3 Water Crystal, Big Crystal | As soon as you open the treasure chest, a hoard of Sechs Helicopters ambush you. | |
| E1 | - | - | Clearing mosters opens warp to G1 | |
| E2 | Blue, Mammoo, Ogre Viking, Sealy, Tundra | - | ||
| E3 | Ogre Viking,Sealy | - | ||
| E4 | Snowy | Diamond Ore | Passed out Silver Wolf. | |
| E5 | Mammoo, Ogre Viking, Orc Viking, Sealy | - | ||
| F1 | - | - | ||
| F2 | Emperor Penguin, Mammoo | - | Wind will blow you east in this area, and boulders will fall at random. | |
| F3 | - | - | Red Lever in this area. | |
| F4 | Ogre Viking, Orc Viking | - |
Yellow Lever in this area. There are hidden paths on the left and right sides of this area. | |
| F5 | - | White Grass |
The woman living in this area will give you a random dish each day. Snowman in front of house may give item (carrot, ice cream, water crystal); item can regenerate every time you reenter the area. | |
| F6 | Ogre Viking | X2 Boxes | ||
| F7 | Snowy | White Grass | ||
| F8 | - | - | Steel Heart | |
| G1 | - | Diamond Ore, X2 Boxes | Green Lever in this area. | |
| G2 | - | White Grassm X2 Boxes | There is a hidden path on the left side of this area. | |
| G3 | - | - | Master Cure | If you enter this room from the north side, you can only push a pressure switch. If you enter from the east side, you can explore the room. |
| G4 | Orc Viking, Sealy, Tundra | - | ||
| H1 | Orc Viking | - | ||
| I1 | - | - | -Save Point- | |
| I2 | - | - | Go east to enter Maya Road. |
Cave

| Area | Monsters | Items | Chests | Notes |
|---|---|---|---|---|
| A1 | - | Gold Ore, Sapphire Ore, Diamond Ore | The left hole in this area goes to B1, the right goes to C1 | |
| B1 | - | - | The left wall in this area is an illusion. | |
| B2 | - | Rune Crystal, X2 Boxes | There's a hidden room south of this room, containing a Rune Crystal. | |
| B3 | - | - | There's a hidden room north of this room, containing a chest with Giga Swing skill. | |
| B4 | Little Wizard | - | ||
| C1 | Death Stalker | - | ||
| C2 | Death Stalker | - | ||
| C3 | Death Stalker | - | Fishing area | |
| C4 | Death Stalker | - | ||
| C5 | - | - | Go east to Field 1 A1 |
Field 2
| Area | Monsters | Items | Chests | Notes |
|---|---|---|---|---|
| A1 | Aquameleon | - | ||
| B1 | - | White Stone | ||
| B2 | - | - | ||
| B3 | - | - | There is a hidden path at the bottom of this area. | |
| B4 | Mammoth | - | ||
| B5 | - | X2 Boxes | -Save Point- | |
| C1 | Flowey Crystal, Little Wizard | - | ||
| C2 | Titan | - | ||
| C3 | Titan | - | ||
| C4 | Flower Crystal, Little Wizard, Sealy | - | To go west from this area, your spouse and child must be in your party at the time. | |
| C5 | Flower Crystal, Hunter Wolf, Little Wizard | - | ||
| C6 | Hunter Wolf | - | Explosion, Twin Attack (Skill) | Wind blows south in this area, and boulders will fall at random. |
| D1 | Flower Crystal, Little Wizard | - | ||
| D2 | Little Wizard | - | You can exit from this area to the north, but a wall will prevent you from entering from that direction. | |
| D3 | Flower Crystal, Hunter Wolf | X4 Boxes | Wind blows you south in this area. | |
| E1 | Flower Crystal, Hunter Wolf, Sealy | - | ||
| E2 | Hunter Wolf, Silver Wolf | - | You can enter this area from the north, but a wall will prevent you from exiting that direction. | |
| E3 | Flower Crystal, Hunter Wolf | - | Straight Punch (Skill) | Clear room for chest to show. |
| F1 | - | White Grass | -Save Point- |
Floating Empire
Main
East
| Area | Monsters | Items | Chests | Notes |
|---|---|---|---|---|
| A1 | Gasham, Sechs Sorcerer | - | Pink Lever in this room | |
| B1 | - | X2 Boxes | Red Lever in this room | |
| B2 | - | - | ||
| B3 | Gasham, Hover Warrior | X2 Boxes | ||
| B4 | Blood Panther, Gasham, Hover Warrior | - | ||
| C1 | - | - | ||
| C2 | Blood Panther, Gasham, Hover Soldier | - | ||
| C3 | Blood Panther, Hover Warrior | - | ||
| C4 | Blood Panther, Hover Warrior | X1 Box | ||
| C5 | Sechs Cat, Sechs Dragon, Sechs Sorcerer | X2 Boxes | Warp to F4 | |
| C6 | - | - | ||
| D1 | - | - | -Save Point- | |
| D2 | Hover Soldier | X2 Boxes | ||
| D3 | Hover Soldier | - | ||
| D4 | Blood Panther | X3 Boxes | ||
| D5 | Hover Warrior | - | ||
| D6 | Master Giant | - | Green Lever in this room. (Only accessible if room is entered from the north.) | |
| D7 | - | - | ||
| D8 | Sechs Tank | - | ||
| D9 | - | - | ||
| E1 | Gigantes | - | ||
| E2 | - | Ellie Leaves | ||
| E3 | Hell Spider | Elli Leaves | Blue Lever in this room. | |
| E4 | - | - | Lime Green lever in this room. | |
| E5 | - | - | ||
| F1 | Gigantes | Elli Leaves, X1 Box | Yellow Lever in this room. | |
| F2 | Hover Warrior | - | ||
| F3 | Hovver Warrior | - | ||
| F4 | Blood Panther, Gasham, Gigantes, Hell Spider, Hover Soldier, Hover Warrior | - | ||
| G1 | Hover Warrior | - | Purple Lever in this room. |
South
| Area | Monsters | Items | Chests | Notes |
|---|---|---|---|---|
| A1 | - | - | ||
| A2 | - | X1 Box |
-Save Point- Go north to enter the central part of the Floating Empire. | |
| A3 | Little Dragon, Sechs Cat, Sechs Sorcerer, Thunderbird | - | ||
| B1 | Fortoise, Little Dragon | X2 Boxes | Wind blocks the path north. You can access the room the path leads to via the warp point in H1. | |
| B2 | Thunderbird | - | Wind blocks the path east. You will need to use the warp point in E3 to access that path. | |
| B3 | Hover Solider | - | ||
| C1 | Fortoise, Thundebird | X2 Boxes | ||
| C2 | Hover Soldier | - | Blue Lever in this room. | |
| C3 | Hover Soldier | - | ||
| D1 | - | X2 Boxes | ||
| D2 | Hover Soldier | X2 Bomb Boxes |
Green Lever in this room. Wind blocks the east path. You will need to southern beat the boss to go further that direction. | |
| D3 | Little Dragon, Thunderbird | - | ||
| D4 | Hover Soldier | X2 Boxes | ||
| E1 | Hover Soldier | - | ||
| E2 | Fortoise, Little Dragon, Thunderbird | - | ||
| E3 | Hover Warrior | - | A warp point in thie room will take you to B2. | |
| E4 | Fortoise, Pepper Ghost, Sechs Cat, Thunderbird | - | ||
| E5 | Pepper Ghost, Thunderbird | - | A lever in this room will let you control the wind blowing through the eastern path | |
| E6 | - | X2 Boxes | A lever at the bottom of this area controls which direction the wind will blow through the room. | |
| E7 | Hell Spider, Pepper Ghost | - | A warp point in this room will take you to D4. | |
| F1 | Fortoise, Pepper Ghost, Sechs Cat | X2 Boxes | ||
| F2 | - | X1 Box | -Save Point- | |
| F3 | Little Dragon, Sechs Cat, Thunderbird | X2 Boxes | ||
| G1 | Armored Tank + | - | ||
| H1 | - | - | ||
| H2 | - | - | The northern warp point in this room goes to D1. (The top block baracading you from it can be gone around.) The souther warp point goes to A1. |
West
| Area | Monsters | Items | Chests | Notes |
|---|---|---|---|---|
| A1 | - | X2 Boxes | ||
| A2 | Faust, Golem | X2 Boxes, X1 Bomb Box | ||
| A3 | Dark Slime, Fause, Hover Warrior | - | Warp goes to D7 | |
| A4 | - | - | ||
| B1 | Hover Warrior | - | ||
| B2 | - | - | Warp goes to E3 | |
| B3 | Dark Slime, Faust, Hell Spider | - | ||
| B4 | Hell Spider | X1 Box | Warp goes to D7 | |
| C1 | Dark Fairy, Dark Slime, Hell Spider, Sechs Dragon | - | ||
| C2 | - | - | Warp goes to D3 | |
| C3 | Dark Slime | X1 Box | Warp goes to A3 | |
| D1 | - | - | The bottom left block can be walked through. | |
| D2 | Sechs Golem | - | ||
| D3 | - | - | -Save Point- | |
| D4 | Dark Fairy, Golem, Sechs Dragon | - | Warp goes to C1 | |
| D5 | Dark Fairy, Hell Spider | - | Warp goes to G2 | |
| D6 | Faury, Hell Spider | - | ||
| D7 | Dark Slime, Faust | X1 Box |
Top warp goes to B3 Bottom warp goes to F3 | |
| D8 | Dark Slime | - | ||
| D9 | - | X2 Boxes | -Save Point- | |
| E1 | - | - | Warp goes to G3 | |
| E2 | Dark Fairy, Dark Slime, Hell Spider | - | ||
| E3 | Dark Fairy, Faust, Golem | - | ||
| E4 | Faust | X1 Boes | ||
| F1 | - | - | Warp goes to D7 | |
| F2 | Dark Slime, Faust | Elli Leaves | Warp goes to E2 | |
| F3 | Dark Slime, Hell Spider | - | ||
| F4 | Hell Spider | - |
Warp goes to D2 The first block on the bottom left can be walked through. | |
| G1 | - | - | Warp goes to A2 | |
| G2 | Dark Fairy, Faust | X2 Boxes | ||
| G3 | - | Elli Leaves, X2 Boxes | ||
| G4 | Hover Soldier, Hover Warrior | - | Warp goes to D7 |
Rune Prana
First Floor
| Area | Monsters | Items | Chests | Notes |
|---|---|---|---|---|
| A1 | Flare Mage | - | The monsters in this room are protected by a stone barrier. Face them with a weapon that has long range, and equip and eat items that provide high fire resistant. (Fire Brooch and Ice Cream recommended.) | |
| A2 | Bane Dragon | - | ||
| A3 | Armored Ghost, Green Dragon | - | ||
| B1 | Onionger | Orichancum Ore, X2 Boxes | ||
| B2 | Flare Mage, Green Dragon | - | The door going north in this room will not open until you hit the levers in A1 and A3. | |
| B3 | Armored Ghost, Flare Mage | X2 Boxes | ||
| C1 | Flare Mage, Green Dragon | - | ||
| D1 | - | - | Warp points too all other floors will apear in thie room as you reach them. |
Second Floor
| Area | Monsters | Items | Chests | Notes |
|---|---|---|---|---|
| A1 | Octopirate 2 | - | ||
| B1 | - | - | Two Wind Traps in this room. | |
| B2 | - | - | Ice Trap in this room. | |
| B3 | - | - | Anette's Necklace (Recipe), X4 Greenifier+ |
Strong wind blows east across this room. Use Heavy Boots to access chests. |
| B4 | Goblin Don, King Bee | Ellie Leaves | Winds blow east across this room. | |
| C1 | - | - | Wind Trap in this room. | |
| C2 | King Bee | - | ||
| C3 | Goblin Don, King Bee | - | Winds blow south-east across this room. | |
| C4 | ||||
| D1 | Big Duck, King Bee | Ellie Leaves, Platiunum Ore, Orichalcum Ore | Double Kick (Skill) | |
| D2 | Big Duck | - | ||
| D3 | - | Platiunum Ore, Orichalcum Ore | Strong winds blow across the north and south paths in this room. You can take them to leave D3, but not to enter unless you are weighed down. | |
| D4 | King Bee, Green Dragon | - |
Third Floor

| Area | Monsters | Items | Chests | Notes |
|---|---|---|---|---|
| A1 | Crsytal Mammoth 2 | |||
| A2 | High Orc Viking, Turnip Ghost | |||
| B1 | High Ogre Viking | |||
| B2 | High Ogre Viking | |||
| B3 | Turnip Ghost | |||
| B4 | High Orc Viking | |||
| B5 | High Ogre Viking, High Orc Viking, Turnip Ghost | |||
| C1 | High Ogre Viking, High Orc Viking | Platinum Ore | Warp to A2 in the bottom of the room | |
| C2 | - | Orichalcum Ore, Diamond Ore, Rune Crystal |
Fourth Floor
| Area | Monsters | Items | Chests | Notes |
|---|---|---|---|---|
| A1 | Hinoe, Kinoto | - | ||
| A2 | Master Troll | - | ||
| B1 | Red Dragon | - | This room will continuously deal fire damage to anyone in it. | |
| B2 | Ant Queen, Red Dragon | - | This room will continuously deal fire damage to anyone in it. | |
| B3 | Ant Queen, Leoplicant, Red Dragon | Red Lever in this room.
This room will continuously deal fire damage to anyone in it. | ||
| C1 | Ant Queen, Leoplicant, King Bee | - | Green Lever in this room.
This room will continuously deal fire damage to anyone in it. | |
| C2 | - | - | Fire Trap in this room. | |
| D1 | Ant Queen, Ignis, Leoplicant | - | ||
| D2 | Leoplicant | X2 Boxes | ||
| D3 | Ant Queen, King Bee | - | This room will continuously deal fire damage to anyone in it. | |
| D4 | Red Dragon | - | ||
| E1 | Ant Queen | Orichalcum Ore |
Fifth Floor

| Area | Monsters | Items | Chests | Notes |
|---|---|---|---|---|
| A1 | Baal, Heaven's Scissors, Ice Wizard |
The lever in this room will summon aditional monsters. This room will poison anyone who enters it. | ||
| A2 | - | - | Stew Recipe | |
| A3 | Siren | - | ||
| B1 | Baal, Heaven's Scissors | - | This room will poison anyone who enters it. | |
| B2 | Baal, Heaven's Scissors, Ice Wizard | - | This room will poison anyone who enters it. | |
| B3 | - | - |
Wind blows west across this room and bolders fall at random. There is a hidden path at the top of this room. | |
| B4 | Heaven's Scissors | - | Yellow Lever in this room. | |
| B5 | Baal | Platinum Ore, Orichalcum Ore | ||
| C1 | Baal, Heaven's Scissors, Ice Wizard | - | This room will poison anyone who enters it. | |
| C2 | Ice Wizard | - | Wind blows east across this room. | |
| C3 | - | - | Earth Trap in this room. | |
| C4 | Heaven's Scissors | - | Red Lever in this room. | |
| D1 | Heaven's Scissors, Ice Wizard | - | ||
| D2 | - | - | Water Lasers in this room. | |
| D3 | Black Bird, Weagle | Oricalcum Ore | Water Lasers in this room. |
Sixth Floor
| Area | Monsters | Items | Chests | Notes |
|---|---|---|---|---|
| A1 | Blackbird, Weagle, Yellow Dragon | - | Water Trap in this room. | |
| A2 | Elemental Emperor | - | The monsters in this room are behind a barrier. You will need a long ranged weapon to hit them. | |
| A3 | - | - | Fluffy Scarf (recipe) |
Warp to B2 Water and Light Traps in this room. |
| A4 | Death Wall | - | ||
| B1 | Yellow Dragon | - | ||
| B2 | Pink Dragon | - | ||
| B3 | Guardian | - | ||
| B4 | - | - | Fireball Lvl 8 | |
| C1 | Guardian | - | Dark Trap in this room. | |
| C2 | Blackbird, Weagle | - | Dark Trap in this room. | |
| C3 | Elemental Emperor, Blue Dragon, Red Dragon | - | ||
| C4 | Blue Dragon | - | ||
| C5 | Elemental Emperor | - | Water Trap in this room. | |
| C6 | Blackbird, Weagle | - | Light Trap in this room. | |
| D1 | - | - | Gyoza (recipe) | |
| D2 | Elemental Emperor | - | ||
| D3 | Blackbird, Elemental Emperor, Weagle | - | Light Trap in this room. | |
| D4 | Elemental Emperor, Green Dragon, Red Dragon | - |
Seventh Floor

| Area | Monsters | Items | Chests | Notes |
|---|---|---|---|---|
| A1 | - | - | Royal Garter (recipe), Executioner (recipe), Rune Edge (recipe) | Black chest items will be in the room when you open it with a normal crop. Grey chest items will be in the room when you open it with a golden crop. |
| A2 | Ragnarok | - | - | Go north to Venti. |
| B1 | Baal, Death Orc, Guardian | Rune Crystal | - | Purple Lever in this room. |
| B2 | Captain Goblin, Gobling Don, Goblin Pirate, High Ogre Viking, Ogre Viking, Orc Viking | - | - | You need a Tyrant Turnip to go north from this room. The next time, you will need a Golden Tyrant Turnip. |
| B3 | Blue Dragon, Green Dragon, Little Dragon, Pink Dragon, Red Dragon, Yellow Dragon | - | - | |
| B4 | Emerald, Marin, Olive, Rouge | - | ||
| B5 | - | - | - | Lime Green Lever in this room. |
| B6 | - | - | Crown (recipe), Magic Broom (recipe), Hand of God (recipe) | Black chest items will be in the room when you open it with a normal crop. Grey chest items will be in the room when you open it with a golden crop. |
| C1 | ??? | - | - | |
| C2 | Elemental Emperor, Ice Wizard, Flare Mage, Little Emperor, Little Wizard | - | - | |
| C3 | Airror, Gais, Ignis, Tundra, Spirit | - | - | |
| C4 | - | Dragonic Ore | - | Purple Lever in this room. |
| C5 | G. Golem | - | - | |
| C6 | Gasham, Hover Soldier, Hover Warrior, Little Golem | - | - | |
| C7 | Dark Fairy, Fairy, Leoplicant, Malm Tiger, Palm Cat | - | - | |
| C8 | Onion Ghost, Pepper Ghost, Tomato Ghost, Turnip Ghost | - | - | You need a Princely Potato or to go north from this room. The next time, you will need a Golden Princely Potato. |
| D1 | Baal, Gigantes, Hammer Troll, Minotaur King | - | - | |
| D2 | Death Orc | - | - | Blue Lever in this room. |
| D3 | - | Dragonic Ore | - | Red Lever in this room. |
| D4 | X2 Greater Daemon | - | - | |
| D5 | Big Muck, Leaf Ball, Planchoa, Trick Muck | - | - | |
| D6 | Dark Slime, Faust, Ghost, Necro, Slime | - | - | |
| D7 | Black Dragon | Rune Crystal | - | Green Lever in this room. |
| E1 | - | Dragonic Ore | Dragonic Stone | |
| E2 | Black Bird, Elefun, Mammoo, Thunderbird | - | - | |
| E3 | Chimera 2 | - | - | |
| E4 | - | - | - | |
| E5 | Dead Tree 2 | - | - | |
| E6 | Ant, Ant Queen, Beatle, Heaven's Scissors, Hell Spider, Hercules, Hornet, King Bee, Spider, Queen Hornet | - | - | You need a King Cabbage or to go east from this room. The next time, you will need a Golden King Cabbage. |
| E7 | - | - | Knight's Boots (recipe), Dragon Slayer (recipe), Balmung (recipe) | Black chest items will be in the room when you open it with a normal crop. Grey chest items will be in the room when you open it with a golden crop. |
| F1 | Duck, Emperor Penguin, Fortoise, Sealy, Sky Fish, Tortoise | - | ||
| F2 | Blood Panther, Arch Daemon, Daemon, Shadow Panther | - | - | |
| F3 | Buffaloo, Hunter Wolf, Rider Orc, Silver Wolf | - | - | You need a Doom Pumpkin or to go south from this room. The next time, you will need a Golden Doom Pumpkin. |
| F4 | - | Dragonic Ore | - | Yellow Lever in this room. |
| F5 | Goblin, Gobin Archer, Goblin Sniper, Hobgobling, Orc, Orc Archer | - | - | |
| F6 | Chipsqueek, Furpy, Mino, Piney, Pomme-Pomme, Snowy | - | - | |
| F7 | King Wooly, Shmooly, Wooly | - | - | Light Blue Lever in this room. |
| G1 | - | - | Art of Attack (recipe), Art of Defense (recipe), Art of Magic (recipe), Gae Bolg (recipe), Kongo (recipe) | Black chest items will be in the room when you open it with a normal crop. Grey chest items will be in the room when you open it with a golden crop. |
Bonus Areas
These are additional dungeons with no plot relevance. They do not have set designs, and are instead a series of randomly generated, square shaped rooms. Each room will need to be cleared of monsters before you can pass to the next, and rooms with treasure chests may produce high level equipment or dishes. Odd numbered floors will have a stronger than average monster that must be defeated to move to the next floor, while even numbered floor will have a boss monster that needs to be defeated.
Sharance Maze
After you have finished Act II, it's possible to have a branch of the Sharance Tree from Rune Factory 3 imported. The branch will be placed in your trophy room, and you may enter the Sharance Maze by inspecting it. Unlike in Rune Factory 3, you cannot do multiplayer through the maze.
There are six different mazes, in which you can fight the four Native Dragons and Ragnarok.
Garden of Light
Level 300*On Easy
- Floor 2: Great Daemon 2
- Floor 4: Chimera 2
- Floor 6: Grimoire 2
- Floor 8: G.Golem
- Floor 10: Terrable
Smoldering Prominence
- Floor 2: Dead Tree 2
- Floor 4: Octopirate 2
- Floor 6: Bane Dragon
- Floor 8: Crystal Mammoth 2
- Floor 10: Fiersome
Deepwater Shrine
- Floor 2: Magnuto
- Floor 4: Ancient Bones
- Floor 6: Hinoe and Kinoto
- Floor 8: Death Wall
- Floor 10: Aquaticus
Dragon Ruins
- Floor 2: Ambrosia
- Floor 4: Thunderbolt
- Floor 6: Marionetta
- Floor 8: Heaven's Gate
- Floor 10: Sarcophagus
- Floor 12: Ventuswill
Challenge to Fantasy
- Even # Floors 2-18: Random Boss Monster
- Floor 20: Ragnarok
Banquet of Nightmares
- Even # Floors 2-28: Random Boss Monster
- Floor 30: Ragnarok
Recipe Bread + is rewarded for clearing these dungeons.
Dungeon Flowers
These are dungeons that you can grow in your field. Before Blossom sells them, you can find the seeds for these dungeons by defeating Magnuto, a raccoon-like monster found in the Demon's Den in Sercerezo Hill. After the dungeon finishes growing, you can explore the inside. The content changes depending on the level of the dungeon and, like with most crops, dungeon flowers can be grown extra large.
A level one, regular size dungeon will be two floors, and have a single boss monster. As you increase the level of each dungeon, the level of the monsters within and the number of floors will increase, but there will only ever be one boss monster. At the following levels, these bosses are:
- 1-4: Greater Daemon
- 5-7: Octopirate
- 8-10: Grimoire
- 10-20: Aquaticus